• Shop
    • Accessories
    • Bar Stools
    • Benches
    • Chairs/Loungers
      • Office Chairs
      • Lounge Chairs
    • Lights and Lamps
      • Floor Lamps
      • Cealing Lights
      • Pendant Lamp
      • Table Lamps
    • Outdoor Patio Furniture
    • Sofas / Sectionals
      • Chair
      • Loveseat
    • Tables
      • Coffee Table
      • Dining Table
      • Side Tables
  • Blog
  • About us
  • Contact us
Login / Register
Search
Wishlist
0 items $0.00
Menu
0 items $0.00
-46%
Home Columns Column Wraps Column Wraps VI
Column Wraps V
Column Wraps V $1,299.00 Original price was: $1,299.00.$699.00Current price is: $699.00.
Back to products
Column Wraps VII
Column Wraps VII $1,299.00 Original price was: $1,299.00.$699.00Current price is: $699.00.

Column Wraps VI

Rated 5.00 out of 5 based on 3 customer ratings
(3 customer reviews)

$1,299.00 Original price was: $1,299.00.$699.00Current price is: $699.00.

Add to wishlist
Compare
Add to wishlist
Compare
SKU: 465125514694 Categories: Column Wraps, Columns Tags: 8 foot porch columns, 8ft porch columns, column wrap ideas, column wraps, column wraps home depot, decorative roman columns, faux stone column wraps, front porch column wraps, porch column wraps, porch column wraps home depot, porch post column wraps, roman architecture columns, roman columns for sale, round column wraps, wrapped columns porch, wrapping a column, wraps for columns
Share:
  • Description
  • Additional information
  • Reviews (3)
  • Shipping & Delivery
  • FAQs
Description

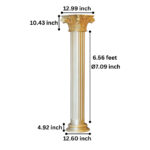
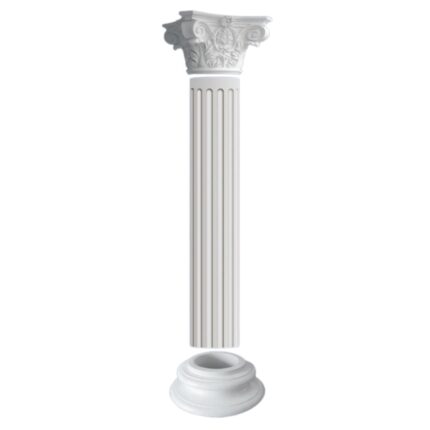
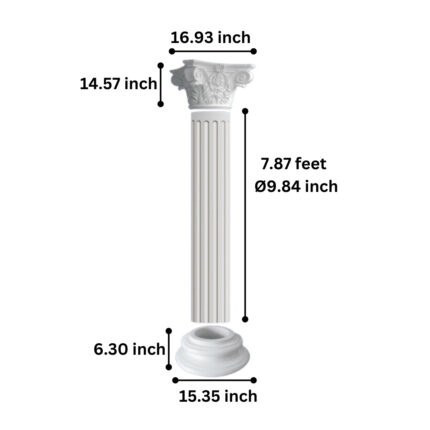
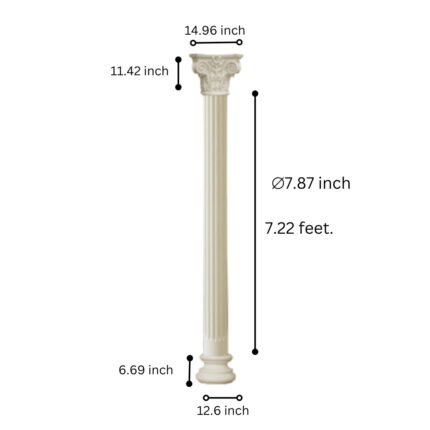
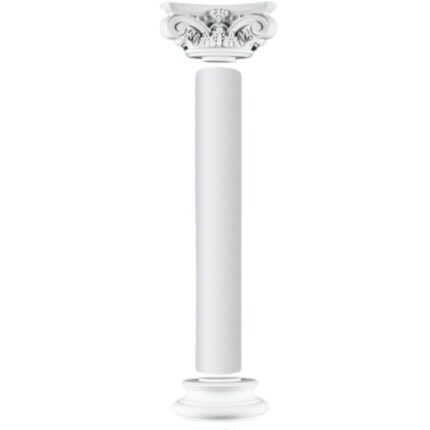
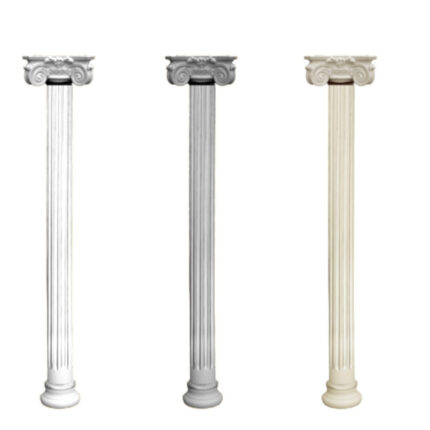
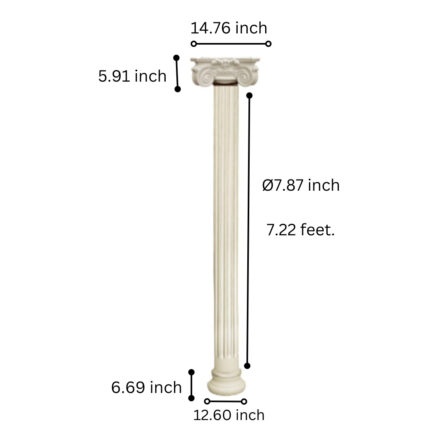
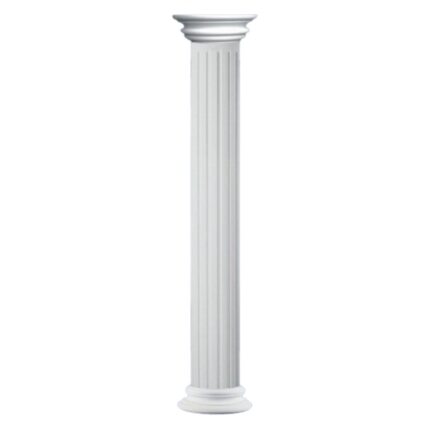
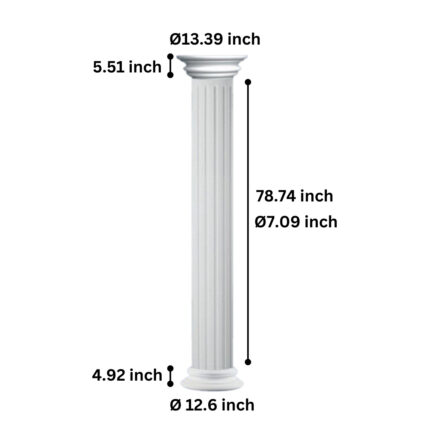
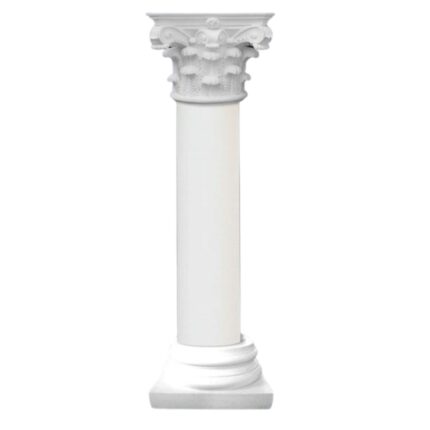
Upgrade your porch with our high-quality Porch Column Wraps. These wraps are designed to add a touch of elegance to your home’s exterior while providing durable protection for your porch columns. Available in a variety of sizes and finishes, our column wraps are easy to install and require minimal maintenance, making them a practical choice for any homeowner. Whether you’re looking to enhance the curb appeal of your home or protect your porch columns from the elements, our Porch Column Wraps are the perfect solution.

Additional information
Material

High-Density Polyurethane

Reviews (3)

3 reviews for Column Wraps VI

  1. Toney S (verified owner) – January 22, 2024

    Rated 5 out of 5

    I couldn’t be happier with these Roman column wraps! I installed them on my porch, and they have become the perfect finishing touch to my outdoor space. The elegant design and durable construction make them a standout feature of my home’s exterior.

    1 product
  2. Hales F (verified owner) – February 8, 2024

    Rated 5 out of 5

    These Roman column wraps are a game-changer for my indoor decor! I used them to add a touch of elegance to my living room, and they have completely transformed the space. Now, it feels like I’m stepping into a grand palace every time I walk through the door.

    1 product
  3. Colin G (verified owner) – February 28, 2024

    Rated 5 out of 5

    These Roman column wraps have exceeded my expectations! I installed them around my patio, and they have become the focal point of my outdoor entertaining area. The timeless design and durable material make them a worthwhile investment for any homeowner.

    1 product
Add a review Cancel reply

Your email address will not be published. Required fields are marked *

Good quality.Good service.The product is firmly packed.Very fast delivery.Very well worth the money.

Shipping & Delivery

100% Customer Satisfaction Guaranteed

We are confident you will love your new furniture from Regency Shop. However, if for any reason you want to return your items, we offer a 14 day RISK-FREE, 100% Satisfaction Guarantee on your purchase, unless otherwise noted, with a return authorization number. We will happily accept your return, however the product must be returned in its original (new) condition, with original packaging, and the customer is responsible for return shipping charges. The original freight charge is non-refundable and there will be 15% restocking fee for all products. Our products are offered with free shipping, so please be aware that if you return one of these products our actual outbound shipping costs will still be deducted from your return refund. All local pick up sales are final and return policy will not apply.
If your shipping address is a "beyond point" then a shipping surcharge may apply. Beyond Point surcharge is calculated by the shipping companies. Beyond points are usually defined by difficult access points, narrow roads, gated communities, islands, rural areas or mountains. There is no way for us to ascertain a "beyond point" until we get shipping quotes from our shipper. We will contact you if your shipping address comes up as a "Beyond Point".

PLEASE FULLY INSPECT YOUR SHIPMENT.

SHIPPING:
Items will typically ship within 2 business days of payment and arriving in 3 to 5 business days your curb. We will send you your tracking number immediately upon shipment. Please remember that the basic shipping for all furniture includes delivery to your curbside, not inside your home. We advise scheduling someone to help you carry your new furniture into your home.

DAMAGE RETURNS:
Damage claims must be reported within 24 hours of delivery. A picture of the damaged item is required, no exceptions. Pre-authorized returns only. Item can only be exchanged for the same item, no refunds are issued.

INTERNATIONAL SHIPPING:
We ship all across the globe.
There is a $99 or more surcharge per item for shipping to Canada, Alaska and Hawaii.

Per-item shipping for most items outside the U.S. is as follows:
By Sea: Shipping $699: Lead-time: 10-15 days
By Air: Shipping $999: Lead-time: 2-5days

Please contact us us for details.

LOCAL PICKUPS
Call us for discounts! Local pickups offer discounts of upto $150 per item!
We offer the convenience of local pickups to customers in the southern California area. Please contact us us directly to schedule a pick up time and to learn about further discounts.

FAQs

Wrapping porch columns can be a great way to enhance the appearance of your home’s exterior. Here’s a general guide on how to wrap porch columns:

Materials Needed:

  • Column wrap kit (available at hardware stores)
  • Tape measure
  • Saw (if columns need to be trimmed)
  • Adhesive (construction adhesive or glue recommended by the manufacturer)
  • Caulk
  • Paint or stain (if desired)
  • Paintbrush or roller

Steps:

  1. Measure the Columns: Measure the height and circumference of each column to determine the size of the column wrap kit you’ll need. Ensure your measurements are accurate to avoid gaps or overlap.
  2. Prepare the Columns: Clean the columns to remove any dirt or debris. If your columns are not already smooth and even, you may need to sand or trim them to ensure a proper fit for the wraps.
  3. Assemble the Wraps: Follow the manufacturer’s instructions to assemble the column wraps. This usually involves attaching the panels or pieces together using the provided connectors or fasteners.
  4. Attach the Wraps: Apply adhesive to the back of the wraps according to the manufacturer’s instructions. Carefully place the wraps around the columns, ensuring they are straight and aligned properly. Use clamps or straps to hold the wraps in place while the adhesive sets.
  5. Secure the Wraps: Once the adhesive has set, secure the wraps further by driving screws or nails through the wraps and into the columns. Follow the manufacturer’s guidelines for spacing and placement of fasteners.
  6. Fill and Seal: Use caulk to fill any gaps between the wraps and the columns, as well as any joints between the wrap panels. This helps to create a seamless appearance and prevents moisture from seeping in.
  7. Paint or Stain (Optional): If desired, paint or stain the wraps to match your home’s exterior. Use a brush or roller to apply the finish evenly, and allow it to dry completely before use.
  8. Finish Up: Once the wraps are installed and finished, step back and admire your work! Your porch columns should now have a fresh, updated look that enhances your home’s curb appeal.

The cost of wrapping porch columns can vary depending on several factors, including the material used for the wraps, the size and number of columns, and the complexity of the installation. Here’s a rough estimate of the cost range for wrapping porch columns:

  • Wood Wraps: Wood wraps are typically the most affordable option, with prices ranging from $100 to $400 per column, depending on the size and quality of the wood.
  • PVC Wraps: PVC wraps are a popular choice due to their durability and low maintenance. Prices for PVC wraps range from $200 to $600 per column, depending on the size and design.
  • Metal Wraps: Metal wraps, such as aluminum or steel, are the most expensive option but offer durability and a modern look. Prices for metal wraps range from $300 to $800 per column, depending on the material and design.
  • Installation Costs: In addition to the cost of the wraps, you’ll also need to factor in installation costs. Installation costs can vary depending on the complexity of the job and the contractor’s rates but typically range from $200 to $600 per column.

Overall, the total cost to wrap porch columns can range from $300 to $1,400 or more per column, depending on the material and installation costs. It’s a good idea to get quotes from several contractors to compare prices and find the best deal for your project.

Building porch column wraps can be a rewarding DIY project that enhances the appearance of your home’s exterior. Here’s a general guide on how to build porch column wraps:

Materials Needed:

  • Plywood or MDF sheets
  • Trim boards (optional)
  • Construction adhesive
  • Nails or screws
  • Caulk
  • Paint or stain
  • Paintbrush or roller

Tools Needed:

  • Tape measure
  • Saw (circular saw or miter saw)
  • Drill
  • Hammer or nail gun
  • Caulking gun

Steps:

  1. Measure and Cut the Plywood/MDF:
    • Measure the height and circumference of each column to determine the size of the wraps.
    • Use a circular saw or miter saw to cut the plywood or MDF sheets to the appropriate size for each column.
  2. Assemble the Wraps:
    • If desired, add decorative trim boards to the plywood or MDF sheets to create a more ornate look.
    • Use construction adhesive to attach the trim boards to the plywood or MDF sheets.
  3. Attach the Wraps to the Columns:
    • Apply construction adhesive to the back of the wraps.
    • Carefully place the wraps around the columns, ensuring they are straight and aligned properly.
    • Use nails or screws to secure the wraps to the columns, driving them through the plywood or MDF into the columns.
  4. Fill and Seal:
    • Use caulk to fill any gaps between the wraps and the columns, as well as any joints between the plywood or MDF sheets.
    • This helps to create a seamless appearance and prevents moisture from seeping in.
  5. Paint or Stain:
    • Once the wraps are installed and caulk is dry, paint or stain the wraps to match your home’s exterior.
    • Use a brush or roller to apply the finish evenly, and allow it to dry completely before use.
  6. Finish Up:
    • Once the wraps are painted or stained, step back and admire your work! Your porch columns should now have a fresh, updated look that enhances your home’s curb appeal.

Keep in mind that building porch column wraps requires precision and attention to detail. If you’re not comfortable with DIY projects or if your columns are structurally important, it may be best to hire a professional contractor to ensure the wraps are installed correctly and safely.

Wrapping a 4×4 porch column is a relatively simple process that can be completed with basic carpentry skills and tools. Here’s a general guide on how to wrap a 4×4 porch column:

Materials Needed:

  • PVC or composite column wrap kit
  • Construction adhesive
  • Nails or screws
  • Caulk
  • Paint or stain (if desired)
  • Paintbrush or roller

Tools Needed:

  • Tape measure
  • Saw (circular saw or miter saw)
  • Drill
  • Hammer or nail gun
  • Caulking gun

Steps:

  1. Measure the Column:
    • Measure the height of the column and the circumference of each side to determine the size of the wrap kit you’ll need.
  2. Cut the Wrap:
    • Use a saw to cut the column wrap kit to the appropriate height, following the manufacturer’s instructions.
  3. Assemble the Wrap (if necessary):
    • Some column wrap kits may require assembly. Follow the manufacturer’s instructions to assemble the wrap, if necessary.
  4. Apply Adhesive:
    • Apply construction adhesive to the back of the wrap according to the manufacturer’s instructions.
  5. Attach the Wrap:
    • Carefully place the wrap around the column, ensuring it is straight and aligned properly.
    • Use clamps or straps to hold the wrap in place while the adhesive sets.
    • Use nails or screws to further secure the wrap to the column, driving them through the wrap and into the column.
  6. Fill and Seal:
    • Use caulk to fill any gaps between the wrap and the column, as well as any joints in the wrap itself.
    • This helps to create a seamless appearance and prevents moisture from seeping in.
  7. Paint or Stain (if desired):
    • If desired, paint or stain the wrap to match your home’s exterior.
    • Use a brush or roller to apply the finish evenly, and allow it to dry completely before use.
  8. Finish Up:
    • Once the wrap is installed and finished, step back and admire your work! Your 4×4 porch column should now have a fresh, updated look that enhances your home’s curb appeal.

Always follow the manufacturer’s instructions and safety guidelines when wrapping a porch column. If you’re unsure about any step of the process, it’s best to consult with a professional contractor.

Wrapping garland around porch columns can create a festive and welcoming look, especially during the holiday season. Here’s a general guide on how to wrap garland around porch columns:

Materials Needed:

  • Garland
  • Zip ties or floral wire
  • Command hooks or adhesive hooks (if needed)
  • Decorations (optional)
  • Scissors

Steps:

  1. Measure the Columns: Measure the height and circumference of each porch column to determine the length of garland needed.
  2. Start at the Top: Begin wrapping the garland at the top of the column. If using pre-lit garland, make sure the plug reaches a power source.
  3. Secure the Garland: Use zip ties or floral wire to secure the garland to the column at various points along the length. Make sure it is wrapped securely but not too tight to avoid damaging the garland or the column.
  4. Wrap Around: Continue wrapping the garland around the column, securing it with zip ties or floral wire as you go. Overlap the garland slightly to create a full look.
  5. Add Decorations (Optional): If desired, you can add decorations such as bows, ornaments, or lights to the garland as you wrap it around the column. Secure these decorations with zip ties or floral wire.
  6. Secure the Bottom: Once you have wrapped the garland around the column, secure the end of the garland with zip ties or floral wire.
  7. Adjust as Needed: Step back and take a look at the wrapped garland. Make any adjustments to ensure it looks even and full.
  8. Optional Hooks: If you are having trouble securing the garland directly to the column, you can use command hooks or adhesive hooks to hold the garland in place. Just make sure the hooks are rated to hold the weight of the garland.
  9. Finish Up: Once you are satisfied with the look of the wrapped garland, step back and admire your work! Your front porch columns should now have a festive and welcoming appearance.

Wrapping porch columns for Christmas can create a festive and inviting look. Here’s a general guide on how to wrap porch columns for Christmas:

Materials Needed:

  • Garland (preferably pre-lit for convenience)
  • Zip ties or floral wire
  • Outdoor Christmas lights (optional)
  • Decorations such as bows, ornaments, or ribbons
  • Command hooks or adhesive hooks (if needed)
  • Scissors

Steps:

  1. Measure the Columns: Measure the height and circumference of each porch column to determine the length of garland needed.
  2. Start at the Top: Begin wrapping the garland at the top of the column. If using pre-lit garland, make sure the plug reaches a power source.
  3. Secure the Garland: Use zip ties or floral wire to secure the garland to the column at various points along the length. Make sure it is wrapped securely but not too tight to avoid damaging the garland or the column.
  4. Wrap Around: Continue wrapping the garland around the column, securing it with zip ties or floral wire as you go. Overlap the garland slightly to create a full look.
  5. Add Lights (Optional): If desired, you can add outdoor Christmas lights to the garland as you wrap it around the column. Secure the lights with zip ties or floral wire and make sure the plug reaches a power source.
  6. Add Decorations: Once the garland is in place, you can add decorations such as bows, ornaments, or ribbons. Secure these decorations with zip ties or floral wire.
  7. Secure the Bottom: Once you have wrapped the garland around the column and added decorations, secure the end of the garland with zip ties or floral wire.
  8. Optional Hooks: If you are having trouble securing the garland directly to the column, you can use command hooks or adhesive hooks to hold the garland in place. Just make sure the hooks are rated to hold the weight of the garland.
  9. Adjust as Needed: Step back and take a look at the wrapped garland. Make any adjustments to ensure it looks even and festive.
  10. Finish Up: Once you are satisfied with the look of the wrapped garland, step back and admire your work! Your porch columns should now have a festive and welcoming appearance for Christmas.

Wrapping porch columns in wood can add a beautiful, natural look to your home’s exterior. Here’s a general guide on how to wrap porch columns in wood:

Materials Needed:

  • Wood boards (cedar, pine, or other weather-resistant wood)
  • Construction adhesive
  • Nails or screws
  • Caulk
  • Paint or stain (if desired)
  • Paintbrush or roller

Tools Needed:

  • Tape measure
  • Saw (circular saw or miter saw)
  • Drill
  • Hammer or nail gun
  • Caulking gun

Steps:

  1. Measure the Columns: Measure the height and circumference of each porch column to determine the size of the wood boards needed.
  2. Prepare the Columns: Clean the columns to remove any dirt or debris. Sand or trim the columns if they are not smooth and even.
  3. Cut the Wood Boards: Use a saw to cut the wood boards to the appropriate height for each column. You may need to cut the boards at an angle to fit the tapered shape of the column.
  4. Attach the Wood Boards: Apply construction adhesive to the back of the wood boards according to the manufacturer’s instructions. Place the wood boards around the column, ensuring they are straight and aligned properly. Use nails or screws to further secure the wood boards to the columns, driving them through the boards and into the columns.
  5. Fill and Seal: Use caulk to fill any gaps between the wood boards and the columns, as well as any joints in the wood boards themselves. This helps to create a seamless appearance and prevents moisture from seeping in.
  6. Paint or Stain (if desired): If you want to paint or stain the wood, do so after the adhesive and caulk have dried completely. Use a brush or roller to apply the finish evenly, and allow it to dry completely before use.
  7. Finish Up: Once the wood boards are installed and finished, step back and admire your work! Your porch columns should now have a beautiful, natural look that enhances your home’s curb appeal.

Wrapping porch columns with cedar can add a natural and rustic look to your home’s exterior. Here’s a general guide on how to wrap porch columns with cedar:

Materials Needed:

  • Cedar boards (1×4 or 1×6 cedar boards are commonly used)
  • Construction adhesive
  • Nails or screws
  • Caulk
  • Paint or stain (if desired)
  • Paintbrush or roller

Tools Needed:

  • Tape measure
  • Saw (circular saw or miter saw)
  • Drill
  • Hammer or nail gun
  • Caulking gun

Steps:

  1. Measure the Columns: Measure the height and circumference of each porch column to determine the size of the cedar boards needed.
  2. Prepare the Columns: Clean the columns to remove any dirt or debris. Sand or trim the columns if they are not smooth and even.
  3. Cut the Cedar Boards: Use a saw to cut the cedar boards to the appropriate height for each column. You may need to cut the boards at an angle to fit the tapered shape of the column.
  4. Attach the Cedar Boards: Apply construction adhesive to the back of the cedar boards according to the manufacturer’s instructions. Place the cedar boards around the column, ensuring they are straight and aligned properly. Use nails or screws to further secure the cedar boards to the columns, driving them through the boards and into the columns.
  5. Fill and Seal: Use caulk to fill any gaps between the cedar boards and the columns, as well as any joints in the cedar boards themselves. This helps to create a seamless appearance and prevents moisture from seeping in.
  6. Paint or Stain (if desired): If you want to paint or stain the cedar, do so after the adhesive and caulk have dried completely. Use a brush or roller to apply the finish evenly, and allow it to dry completely before use.
  7. Finish Up: Once the cedar boards are installed and finished, step back and admire your work! Your porch columns should now have a beautiful, natural look that enhances your home’s curb appeal.

Wrapping porch columns with Christmas lights can create a festive and welcoming look. Here’s a general guide on how to wrap porch columns with Christmas lights:

Materials Needed:

  • Christmas lights (LED lights are energy-efficient and stay cool)
  • Extension cords (if needed)
  • Zip ties or twist ties
  • Timer or remote control (optional)

Tools Needed:

  • Ladder
  • Scissors

Steps:

  1. Plan the Layout: Decide how you want to wrap the lights around the porch columns. You can spiral the lights from top to bottom, wrap them in a zigzag pattern, or create any other design you prefer.
  2. Start at the Top: Begin at the top of the column and secure the end of the light strand with a zip tie or twist tie.
  3. Wrap the Lights: Wrap the lights around the column, following your planned layout. Ensure the lights are evenly spaced and securely attached to the column.
  4. Secure the Lights: Use zip ties or twist ties to secure the lights to the column at various points along the length. This will prevent the lights from sagging or coming loose.
  5. Continue Wrapping: Continue wrapping the lights around the column, working your way down to the bottom. If you run out of lights, you can start a new strand and continue wrapping from where the previous strand ended.
  6. Plug In the Lights: Once you have wrapped the lights around the column, plug them into a power source. Use extension cords if needed to reach the nearest outlet.
  7. Optional Timer or Remote Control: If you have a timer or remote control for your lights, set it up to turn the lights on and off at your desired times.
  8. Adjust as Needed: Step back and take a look at the wrapped lights. Make any adjustments to ensure they look even and festive.
  9. Finish Up: Once you are satisfied with the look of the wrapped lights, step back and admire your work! Your porch columns should now have a festive and welcoming appearance for Christmas.

When wrapping porch columns with wood, it’s important to choose a wood species that is durable and weather-resistant, especially if the columns will be exposed to the elements. Here are some common options for wood species that are suitable for wrapping porch columns:

  1. Cedar: Cedar is a popular choice for outdoor projects due to its natural resistance to rot, decay, and insects. It has a beautiful natural color and aroma.
  2. Redwood: Redwood is another excellent choice for outdoor use, known for its durability and resistance to rot and insects. It has a rich, reddish-brown color that can add warmth to your porch columns.
  3. Pressure-treated Pine: Pressure-treated pine is an affordable option that has been chemically treated to resist rot, decay, and insects. It’s widely available and can be stained or painted to match your home’s exterior.
  4. Mahogany: Mahogany is a high-end option that offers exceptional durability and resistance to rot and decay. It has a rich, reddish-brown color and is often used for fine woodworking projects.
  5. Ipe: Ipe is a tropical hardwood known for its extreme durability and resistance to rot, decay, and insects. It has a beautiful dark brown color and is highly resistant to moisture, making it ideal for outdoor applications.

When choosing a wood species for wrapping porch columns, consider the local climate and the amount of exposure to moisture and sunlight the columns will receive. Proper maintenance, such as sealing or staining the wood periodically, can help prolong the life of the wood and maintain its appearance.

When wrapping porch columns with wood, it’s important to choose a wood species that is durable and suitable for outdoor use. Here are some common wood options for wrapping porch columns:

  1. Cedar: Cedar is a popular choice for outdoor projects due to its natural resistance to rot, decay, and insects. It is lightweight, easy to work with, and has a pleasant aroma.
  2. Redwood: Redwood is another excellent choice for outdoor applications. It is naturally resistant to rot, decay, and insects, and it has a beautiful, rich color.
  3. Pressure-treated Pine: Pressure-treated pine is an affordable option that has been chemically treated to resist rot, decay, and insects. It is readily available and can be painted or stained to match your home’s exterior.
  4. Mahogany: Mahogany is a high-end option known for its durability and resistance to rot and decay. It has a rich, reddish-brown color and adds a touch of elegance to porch columns.
  5. Ipe: Ipe is a tropical hardwood renowned for its extreme durability and resistance to rot, decay, and insects. It has a beautiful dark brown color and is ideal for areas with high moisture and humidity.

When selecting wood for wrapping porch columns, consider the local climate and the amount of exposure to the elements. Proper maintenance, such as sealing or staining the wood regularly, can help prolong its life and maintain its appearance.

Wrapping lights around porch columns can create a festive and inviting atmosphere. Here’s a general guide on how to wrap lights around porch columns:

Materials Needed:

  • String lights (LED lights are a good choice for their energy efficiency and durability)
  • Extension cords (if needed)
  • Zip ties or twist ties
  • Timer or remote control (optional)

Tools Needed:

  • Ladder
  • Scissors

Steps:

  1. Plan the Layout: Decide how you want to wrap the lights around the porch columns. You can spiral the lights from top to bottom, wrap them in a zigzag pattern, or create any other design you prefer.
  2. Start at the Top: Begin at the top of the column and secure the end of the light strand with a zip tie or twist tie.
  3. Wrap the Lights: Wrap the lights around the column, following your planned layout. Ensure the lights are evenly spaced and securely attached to the column.
  4. Secure the Lights: Use zip ties or twist ties to secure the lights to the column at various points along the length. This will prevent the lights from sagging or coming loose.
  5. Continue Wrapping: Continue wrapping the lights around the column, working your way down to the bottom. If you run out of lights, you can start a new strand and continue wrapping from where the previous strand ended.
  6. Plug In the Lights: Once you have wrapped the lights around the column, plug them into a power source. Use extension cords if needed to reach the nearest outlet.
  7. Optional Timer or Remote Control: If you have a timer or remote control for your lights, set it up to turn the lights on and off at your desired times.
  8. Adjust as Needed: Step back and take a look at the wrapped lights. Make any adjustments to ensure they look even and festive.
  9. Finish Up: Once you are satisfied with the look of the wrapped lights, step back and admire your work! Your porch columns should now have a festive and welcoming appearance.

Wrapping metal porch columns can add a decorative touch and help protect them from the elements. Here’s a general guide on how to wrap metal porch columns:

Materials Needed:

  • Wood or PVC boards (for wrapping)
  • Construction adhesive
  • Nails or screws
  • Caulk
  • Paint or stain (if desired)
  • Paintbrush or roller

Tools Needed:

  • Tape measure
  • Saw (circular saw or miter saw)
  • Drill
  • Hammer or nail gun
  • Caulking gun

Steps:

  1. Measure the Columns: Measure the height and circumference of each metal porch column to determine the size of the boards needed for wrapping.
  2. Prepare the Columns: Clean the columns to remove any dirt or debris. Sand or treat any rust spots if necessary.
  3. Cut the Wrapping Material: Use a saw to cut the wood or PVC boards to the appropriate height for each column. You may need to cut the boards at an angle to fit the tapered shape of the column.
  4. Attach the Wrapping Material: Apply construction adhesive to the back of the boards according to the manufacturer’s instructions. Place the boards around the column, ensuring they are straight and aligned properly. Use nails or screws to further secure the boards to the columns, driving them through the boards and into the columns.
  5. Fill and Seal: Use caulk to fill any gaps between the boards and the columns, as well as any joints in the boards themselves. This helps to create a seamless appearance and prevents moisture from seeping in.
  6. Paint or Stain (if desired): If you want to paint or stain the boards, do so after the adhesive and caulk have dried completely. Use a brush or roller to apply the finish evenly, and allow it to dry completely before use.
  7. Finish Up: Once the boards are installed and finished, step back and admire your work! Your metal porch columns should now have a decorative and protective wrap that enhances your home’s curb appeal.

Wrapping porch columns with garland can create a festive and welcoming look, especially during the holiday season. Here’s a general guide on how to wrap porch columns with garland:

Materials Needed:

  • Garland (preferably pre-lit for convenience)
  • Zip ties or floral wire
  • Command hooks or adhesive hooks (if needed)
  • Decorations (such as bows, ornaments, or ribbons)
  • Scissors

Steps:

  1. Measure the Columns: Measure the height and circumference of each porch column to determine the length of garland needed.
  2. Start at the Top: Begin wrapping the garland at the top of the column. If using pre-lit garland, make sure the plug reaches a power source.
  3. Secure the Garland: Use zip ties or floral wire to secure the garland to the column at various points along the length. Make sure it is wrapped securely but not too tight to avoid damaging the garland or the column.
  4. Wrap Around: Continue wrapping the garland around the column, securing it with zip ties or floral wire as you go. Overlap the garland slightly to create a full look.
  5. Add Decorations (Optional): If desired, you can add decorations such as bows, ornaments, or ribbons to the garland as you wrap it around the column. Secure these decorations with zip ties or floral wire.
  6. Secure the Bottom: Once you have wrapped the garland around the column, secure the end of the garland with zip ties or floral wire.
  7. Optional Hooks: If you are having trouble securing the garland directly to the column, you can use command hooks or adhesive hooks to hold the garland in place. Just make sure the hooks are rated to hold the weight of the garland.
  8. Adjust as Needed: Step back and take a look at the wrapped garland. Make any adjustments to ensure it looks even and full.
  9. Finish Up: Once you are satisfied with the look of the wrapped garland, step back and admire your work! Your porch columns should now have a festive and welcoming appearance.

Wrapping porch columns with ribbon can add a festive touch to your home’s exterior. Here’s a general guide on how to wrap porch columns with ribbon:

Materials Needed:

  • Wide ribbon (preferably weather-resistant)
  • Command hooks or adhesive hooks
  • Scissors
  • Decorative elements (optional)

Steps:

  1. Measure the Columns: Measure the height and circumference of each porch column to determine the length of ribbon needed.
  2. Start at the Top: Begin at the top of the column and secure one end of the ribbon with a command hook or adhesive hook.
  3. Wrap the Ribbon: Wrap the ribbon around the column, overlapping slightly as you go to create a full look. Keep the ribbon taut but not too tight to avoid damaging it.
  4. Secure the Ribbon: Use command hooks or adhesive hooks to secure the ribbon to the column at various points along the length. Make sure the hooks are strong enough to hold the ribbon in place.
  5. Add Decorative Elements (Optional): If desired, you can add decorative elements such as bows, ornaments, or bells to the ribbon. Secure these decorations with small pieces of ribbon or twist ties.
  6. Adjust as Needed: Step back and take a look at the wrapped ribbon. Make any adjustments to ensure it looks even and festive.
  7. Finish Up: Once you are satisfied with the look of the wrapped ribbon, step back and admire your work! Your porch columns should now have a festive and welcoming appearance.

Wrapping porch columns with cedar can add a natural and rustic look to your home’s exterior. Here’s a general guide on how to cedar wrap porch columns:

Materials Needed:

  • Cedar boards (1×4 or 1×6 cedar boards are commonly used)
  • Construction adhesive
  • Nails or screws
  • Caulk
  • Paint or stain (if desired)
  • Paintbrush or roller

Tools Needed:

  • Tape measure
  • Saw (circular saw or miter saw)
  • Drill
  • Hammer or nail gun
  • Caulking gun

Steps:

  1. Measure the Columns: Measure the height and circumference of each porch column to determine the size of the cedar boards needed.
  2. Prepare the Columns: Clean the columns to remove any dirt or debris. Sand or trim the columns if they are not smooth and even.
  3. Cut the Cedar Boards: Use a saw to cut the cedar boards to the appropriate height for each column. You may need to cut the boards at an angle to fit the tapered shape of the column.
  4. Attach the Cedar Boards:
    • Apply construction adhesive to the back of the cedar boards according to the manufacturer’s instructions.
    • Place the cedar boards around the column, ensuring they are straight and aligned properly.
    • Use nails or screws to further secure the cedar boards to the columns, driving them through the boards and into the columns.
  5. Fill and Seal:
    • Use caulk to fill any gaps between the cedar boards and the columns, as well as any joints in the cedar boards themselves. This helps to create a seamless appearance and prevents moisture from seeping in.
  6. Paint or Stain (if desired):
    • If you want to paint or stain the cedar, do so after the adhesive and caulk have dried completely. Use a brush or roller to apply the finish evenly, and allow it to dry completely before use.
  7. Finish Up: Once the cedar boards are installed and finished, step back and admire your work! Your porch columns should now have a beautiful, natural look that enhances your home’s curb appeal.

Replacing aluminum porch wrap columns can be a straightforward process. Here’s a general guide to help you replace them:

Materials Needed:

  • New aluminum porch wrap columns
  • Construction adhesive
  • Nails or screws
  • Caulk
  • Paint or finish (if necessary)
  • Paintbrush or roller

Tools Needed:

  • Tape measure
  • Saw (if columns need to be cut to size)
  • Drill
  • Hammer or nail gun
  • Caulking gun

Steps:

  1. Remove the Old Columns:
    • Use a pry bar or hammer to carefully remove the old aluminum columns from the porch.
    • Remove any nails, screws, or adhesive that may be holding the columns in place.
  2. Prepare the Area:
    • Clean the area where the new columns will be installed to remove any dirt, debris, or old adhesive.
    • Ensure the surface is smooth and even.
  3. Measure and Cut the New Columns (if necessary):
    • Measure the height and circumference of the porch where the new columns will be installed.
    • If the new columns need to be cut to size, use a saw to make the necessary cuts.
  4. Attach the New Columns:
    • Apply construction adhesive to the back of the new columns according to the manufacturer’s instructions.
    • Place the new columns in position on the porch, ensuring they are straight and aligned properly.
    • Use nails or screws to further secure the new columns to the porch, driving them through the columns and into the porch frame.
  5. Fill and Seal:
    • Use caulk to fill any gaps between the new columns and the porch, as well as any joints in the new columns themselves. This helps to create a seamless appearance and prevents moisture from seeping in.
  6. Paint or Finish (if necessary):
    • If the new columns need to be painted or finished, do so after the adhesive and caulk have dried completely. Use a brush or roller to apply the paint or finish evenly, and allow it to dry completely before use.
  7. Finish Up:
    • Once the new columns are installed and finished, step back and admire your work! Your porch should now have updated, sturdy columns that enhance its appearance.

Wrapping a porch column with both wood and stone can create a striking and visually interesting look. Here’s a general guide on how to wrap a porch column with wood and stone:

Materials Needed:

  • Wood boards (cedar, pine, or other weather-resistant wood)
  • Stone veneer panels
  • Construction adhesive for stone
  • Nails or screws
  • Caulk
  • Paint or stain (if desired for wood)
  • Stone mortar (if using natural stone)

Tools Needed:

  • Tape measure
  • Saw (circular saw or miter saw)
  • Drill
  • Hammer or nail gun
  • Caulking gun
  • Trowel (if using natural stone)

Steps:

  1. Measure the Column: Measure the height and circumference of the porch column to determine the size of the wood boards and stone veneer panels needed.
  2. Prepare the Column: Clean the column to remove any dirt or debris. Sand or trim the column if necessary.
  3. Cut the Wood Boards: Use a saw to cut the wood boards to the appropriate height for each section of the column. Cut them at an angle if the column is tapered.
  4. Attach the Wood Boards:
    • Apply construction adhesive to the back of the wood boards according to the manufacturer’s instructions.
    • Place the wood boards around the column, ensuring they are straight and aligned properly.
    • Use nails or screws to further secure the wood boards to the column, driving them through the boards and into the column.
  5. Prepare the Stone Veneer:
    • If using natural stone, mix the stone mortar according to the manufacturer’s instructions.
    • Apply a layer of mortar to the back of each stone veneer panel using a trowel.
  6. Attach the Stone Veneer:
    • Press the stone veneer panels onto the wood-wrapped column, starting from the bottom and working your way up.
    • Ensure the panels are firmly pressed into the mortar and are aligned properly.
  7. Fill and Seal:
    • Use caulk to fill any gaps between the wood boards and the stone veneer, as well as any joints in the wood boards themselves. This helps to create a seamless appearance and prevents moisture from seeping in.
  8. Finish Up:
    • Once the wood and stone are installed and finished, step back and admire your work! Your porch column should now have a unique and eye-catching look that enhances your home’s curb appeal.

Wrapping existing porch columns in stained wood can give them a fresh, updated look. Here’s a general guide on how to wrap existing porch columns in stained wood:

Materials Needed:

  • Wood boards (cedar, pine, or other weather-resistant wood)
  • Stain (choose a color that complements your home’s exterior)
  • Polyurethane sealant
  • Construction adhesive
  • Nails or screws
  • Caulk
  • Paintbrush or roller

Tools Needed:

  • Tape measure
  • Saw (circular saw or miter saw)
  • Drill
  • Hammer or nail gun
  • Caulking gun

Steps:

  1. Measure the Columns: Measure the height and circumference of each existing porch column to determine the size of the wood boards needed.
  2. Prepare the Columns: Clean the columns to remove any dirt or debris. Sand or trim the columns if they are not smooth and even.
  3. Cut the Wood Boards: Use a saw to cut the wood boards to the appropriate height for each column. You may need to cut the boards at an angle to fit the tapered shape of the column.
  4. Stain the Wood Boards:
    • Apply the stain to the wood boards according to the manufacturer’s instructions. Use a brush or roller to apply the stain evenly, and allow it to dry completely.
  5. Attach the Wood Boards:
    • Apply construction adhesive to the back of the stained wood boards according to the manufacturer’s instructions.
    • Place the wood boards around the existing columns, ensuring they are straight and aligned properly.
    • Use nails or screws to further secure the wood boards to the columns, driving them through the boards and into the columns.
  6. Fill and Seal:
    • Use caulk to fill any gaps between the wood boards and the columns, as well as any joints in the wood boards themselves. This helps to create a seamless appearance and prevents moisture from seeping in.
    • Apply a polyurethane sealant over the stained wood to protect it from the elements and enhance its durability.
  7. Finish Up:
    • Once the wood boards are installed and finished, step back and admire your work! Your porch columns should now have a beautiful, stained wood look that enhances your home’s curb appeal.

Wrapping existing porch columns with cedar can give them a fresh, natural look. Here’s a general guide on how to wrap existing porch columns with cedar:

Materials Needed:

  • Cedar boards (1×4 or 1×6 cedar boards are commonly used)
  • Construction adhesive
  • Nails or screws
  • Caulk
  • Polyurethane sealant
  • Paint or stain (if desired)
  • Paintbrush or roller

Tools Needed:

  • Tape measure
  • Saw (circular saw or miter saw)
  • Drill
  • Hammer or nail gun
  • Caulking gun

Steps:

  1. Measure the Columns: Measure the height and circumference of each existing porch column to determine the size of the cedar boards needed.
  2. Prepare the Columns: Clean the columns to remove any dirt or debris. Sand or trim the columns if they are not smooth and even.
  3. Cut the Cedar Boards: Use a saw to cut the cedar boards to the appropriate height for each column. You may need to cut the boards at an angle to fit the tapered shape of the column.
  4. Attach the Cedar Boards:
    • Apply construction adhesive to the back of the cedar boards according to the manufacturer’s instructions.
    • Place the cedar boards around the existing columns, ensuring they are straight and aligned properly.
    • Use nails or screws to further secure the cedar boards to the columns, driving them through the boards and into the columns.
  5. Fill and Seal:
    • Use caulk to fill any gaps between the cedar boards and the columns, as well as any joints in the cedar boards themselves. This helps to create a seamless appearance and prevents moisture from seeping in.
    • Apply a polyurethane sealant over the cedar to protect it from the elements and enhance its durability.
  6. Finish Up:
    • Once the cedar boards are installed and finished, step back and admire your work! Your porch columns should now have a beautiful, cedar-wrapped look that enhances your home’s curb appeal.

Wrapping your front porch columns with stone can really spruce up your home’s curb appeal. Here’s a basic rundown of how to do it, but keep in mind, it can be a bit of a project, so make sure you’re up for the challenge!

  1. Gather Your Materials: You’ll need faux stone panels (or real stone if you’re feeling ambitious), construction adhesive, screws, a saw, a level, a tape measure, and possibly a hammer and nails.
  2. Prepare Your Columns: Clean the columns thoroughly and let them dry completely. If you’re using real stone, you may need to apply a wire mesh or cement board to the columns first to give the stones something to adhere to.
  3. Measure and Cut: Measure the height and circumference of your columns. Cut the stone panels to fit, leaving a small gap at the top and bottom to allow for expansion.
  4. Apply Adhesive: Apply construction adhesive to the back of the stone panels. If you’re using real stone, you’ll also need to apply adhesive to the back of each stone before pressing it onto the column.
  5. Attach the Panels: Press the stone panels onto the column, starting from the bottom and working your way up. Use screws to secure the panels in place, making sure they’re level as you go.
  6. Fill in the Gaps: Once all the panels are in place, use a grout or mortar to fill in any gaps between the stones.
  7. Finish: Let the adhesive and grout dry completely, then step back and admire your work! Your front porch columns should now have a beautiful stone finish that adds a touch of elegance to your home.

Wrapping porch columns with vinyl is a durable and low-maintenance option that can give your home a clean and polished look. Here’s a step-by-step guide on how to do it:

  1. Measure Your Columns: Start by measuring the height and circumference of each porch column you want to wrap. This will help you determine how much vinyl material you’ll need.
  2. Choose the Vinyl Material: Select vinyl wraps specifically designed for outdoor use. These wraps are typically available in rolls and come in various colors and finishes to complement your home’s exterior.
  3. Prepare the Columns: Clean the surface of the columns thoroughly to remove any dirt, dust, or debris. Make sure the columns are dry before proceeding.
  4. Cut the Vinyl Wraps: Using the measurements you took earlier, cut the vinyl wraps into strips that are slightly longer than the height of the columns and wide enough to cover the circumference with some overlap.
  5. Apply Adhesive: Apply a high-quality outdoor adhesive to the back of the vinyl strips. Make sure to follow the manufacturer’s instructions for proper application and drying times.
  6. Wrap the Columns: Starting at the bottom of each column, carefully press the vinyl wrap onto the surface, smoothing out any wrinkles or air bubbles as you go. Continue wrapping the column, overlapping the edges of each strip slightly to ensure full coverage.
  7. Secure the Edges: Once the column is fully wrapped, use a utility knife to trim any excess vinyl from the top and bottom edges. Then, use a heat gun or hairdryer to gently heat the edges of the vinyl and secure them in place.
  8. Repeat for Each Column: Repeat the wrapping process for each porch column, making sure to align the seams of the vinyl wraps for a seamless appearance.
  9. Inspect and Touch Up: After wrapping all the columns, carefully inspect the vinyl for any loose edges or imperfections. Use additional adhesive or heat as needed to secure any loose areas.
  10. Enjoy Your Wrapped Columns: Once the adhesive has fully cured and the vinyl is securely in place, step back and admire your newly wrapped porch columns! Vinyl wrapping provides a sleek and maintenance-free finish that will enhance the appearance of your home’s exterior for years to come.

Alright, so wrapping round porch columns is a neat way to give your porch a fresh look without breaking the bank. Here’s a step-by-step guide to get it done:

  1. Measure Up: First things first, you gotta measure those columns. Measure the circumference (that’s the distance around) and the height of each column. This helps you figure out how much material you’ll need.
  2. Get Your Materials: You’ll need some PVC trim boards, construction adhesive, screws, and a saw to cut the boards to size. PVC is great because it’s durable and weather-resistant.
  3. Cut to Fit: Use your saw to cut the PVC boards to the right length. You want them to fit snugly around the columns.
  4. Glue It Down: Apply construction adhesive to the back of each board and then press them onto the column. Make sure they’re lined up properly and stick ’em on there nice and firm.
  5. Secure with Screws: To make sure those boards stay put, drive screws through them into the column. Make sure the screws are long enough to go through the board and into the column without poking out the other side.
  6. Repeat: Keep cutting, gluing, and screwing until you’ve wrapped all your columns. Take your time and make sure everything looks nice and tidy.
  7. Finishing Touches: Once all the boards are in place, you can caulk any seams or gaps to give it a seamless look. Then, if you want, you can paint the columns to match the rest of your porch.

And that’s it! With a bit of elbow grease and some basic tools, you can give your porch a whole new vibe with wrapped round columns.


Related products

-39%
Compare
Quick view
Add to wishlist
Select options

10″ Round Porch Columns

Columns, Porch Columns, Round
Rated 5.00 out of 5
$349.00 – $1,099.00
-46%
Compare
Quick view
Add to wishlist
Add to cart

Column Wraps X

Columns, Column Wraps
Rated 5.00 out of 5
$1,299.00 Original price was: $1,299.00.$699.00Current price is: $699.00.
-46%
Compare
Quick view
Add to wishlist
Add to cart

Column Wraps XI

Chairs/Loungers, Lounge Chairs
Rated 5.00 out of 5
$1,299.00 Original price was: $1,299.00.$699.00Current price is: $699.00.
-46%
Compare
Quick view
Add to wishlist
Add to cart

Column Wraps – Naples

Columns, Column Wraps
Rated 5.00 out of 5
$1,299.00 Original price was: $1,299.00.$699.00Current price is: $699.00.
-46%
Compare
Quick view
Add to wishlist
Add to cart

Non-tapered PU Column Wraps

Columns, Column Wraps
Rated 4.80 out of 5
$1,299.00 Original price was: $1,299.00.$699.00Current price is: $699.00.
-46%
Compare
Quick view
Add to wishlist
Add to cart

Column Wraps – Palermo

Columns, Column Wraps
Rated 5.00 out of 5
$1,299.00 Original price was: $1,299.00.$699.00Current price is: $699.00.
-46%
Compare
Quick view
Add to wishlist
Add to cart

Column Wraps II

Columns, Column Wraps
Rated 5.00 out of 5
$1,299.00 Original price was: $1,299.00.$699.00Current price is: $699.00.
-46%
Compare
Quick view
Add to wishlist
Add to cart

Column Wraps IV

Columns, Column Wraps
Rated 5.00 out of 5
$1,299.00 Original price was: $1,299.00.$699.00Current price is: $699.00.
SEE OUR COLLECTION

Our Instagram Stories

Elegance without breaking bank!

7823 998
6554 501
3503 942
2299 929
9968 862
9364 586
9118 814
5879 267
7344 915
6493 727
4982 255
  • Home
  • Shop
  • Blog
  • Pages
  • Elements
2023 Regency Shop. All Rights Reserved.
payments
Close
  • Shop
  • About us
  • Contact us
  • Login / Register
Shopping cart
Close

*FREE SHIPPING* ON EVERYTHING

Sign in
Close

Lost your password?

No account yet?

Create an Account
Start typing to see products you are looking for.

Select at least 2 products
to compare

View comparison